The
13th of June already where is this year going. Apparently we're in for a
heat wave soon. Well things are certainly hotting up at Craftstyle and
it's beginning to look a lot like Christmas. We have recently taken
delivery of our brand new printed Christmas Ranges and are looking
forward to the arrival of our 2 new paper pads Traditional Christmas,
Contemporary Christmas and our new paper stack All That Shimmers. Cut
& Create Christmas also see's the arrival of four new designs with
coordinating backing card. We will let you know when they are available
to purchase and also when they will be featured on Create & Craft.
We hope you like them as much as we have enjoyed creating them for you.
Tuesday, 13 June 2017
Wednesday, 2 November 2016
Paper Bow Tutorial B
In this tutorial we'll show you how tho create the second style of bow in the kit which comes as two larger bows and eight small bows with coordinating ribbon strips.
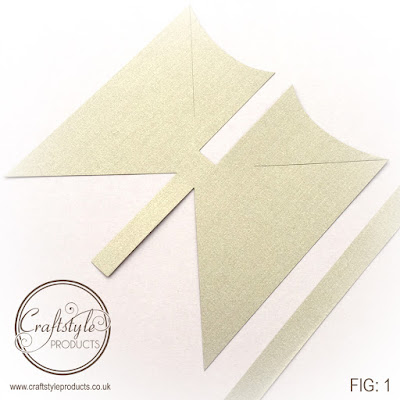
Firstly pop out the size of bow you want to create and either a thick ribbon strip for the large bow or thinner strip for the smaller bow. FIG: 1
Take the top bow part and fold one of the tab ends into the middle securing with glue or strong double sided tape. FIG: 2
Repeat with the other side securing in the middle FIG: 3
You now have the top bow complete ready to stick on to the back bow. FIG: 4
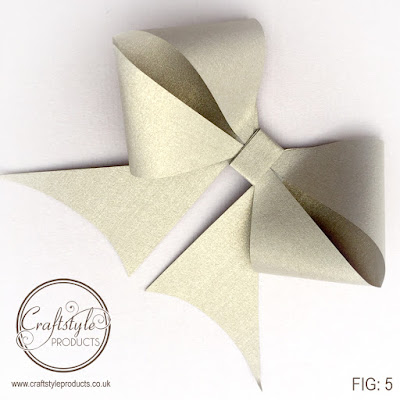
Stick the top bow onto the back bow with glue or tape and. FIG: 5
Using the center piece starting from the back of the bow wrap around the top and bottom bow. FIG: 6
Keep wrapping the center piece around the middle and finish off neatly on the back of the bow. FIG: 7
There you have your finished Bow FIG: 8
All you have to do now is attach the bow to your ribbon strip and use on your cards or paper craft projects. FIG: 9
Firstly pop out the size of bow you want to create and either a thick ribbon strip for the large bow or thinner strip for the smaller bow. FIG: 1
Take the top bow part and fold one of the tab ends into the middle securing with glue or strong double sided tape. FIG: 2
Repeat with the other side securing in the middle FIG: 3
Stick the top bow onto the back bow with glue or tape and. FIG: 5
Using the center piece starting from the back of the bow wrap around the top and bottom bow. FIG: 6
Keep wrapping the center piece around the middle and finish off neatly on the back of the bow. FIG: 7
All you have to do now is attach the bow to your ribbon strip and use on your cards or paper craft projects. FIG: 9
Paper Bow Tutorial A
Lets look at how to use our paper bow sheets that will feature on our Show on Create & Craft at 1pm on Friday 4th November. In the kit you will get 1 sheet of large bows, 1 sheet of small bows and one sheet of ribbon strips. Each sheet comes in 9 different colours, Cappucccino Shimmer, Gold Texture, Silver Shimmer, Gold Shimmer, Gold Dust Shimmer, White Irridescent, Black Linen, Manilla and Beige Parchment.
Firstly take each of the bottom two corners and fold up into the middle securing with either glue or strong double sided tape. FIG:2
Do the same with the top two corners, folding them into the middle keeping the paper nice and curled. FIG 3
Then wrap the attached center strip around the bow again securing with glue or double sided tape. FIG 4
Keep wrapping around and finish off on the back of the ribbon. FIG: 5
Apply the bow to the ribbon strip and that is all there is to it. FIG 6. Use the bows and ribbon on your paper crafting projects. We'll be back later to show you how to create the other style of bow that you get in the kit.
 |
| Add caption |
The kit will let you make 108 bows to add to your crafting projects.
First of all we'll look at the large bow. For this just pop one of the larger bows out of the sheet and also cut one of the thinner ribbon strips from it's sheet. FIG:1
Firstly take each of the bottom two corners and fold up into the middle securing with either glue or strong double sided tape. FIG:2
Then wrap the attached center strip around the bow again securing with glue or double sided tape. FIG 4
Keep wrapping around and finish off on the back of the ribbon. FIG: 5
Apply the bow to the ribbon strip and that is all there is to it. FIG 6. Use the bows and ribbon on your paper crafting projects. We'll be back later to show you how to create the other style of bow that you get in the kit.
Thursday, 27 October 2016
Kokeshi Doll Samples
Here are some of the first samples to be made using our BRAND NEW
Kokeshi Dolls - Designer Decoupage featuring Faith, Love, Hope and
Serenity. The samples also show off the coordinating backing cards and
some of the beautiful papers from the 48 sheet Oriental paper stack. The
bows used on the samples are from our new paper bow making sheets all
die cut and ready to stick together.
All these products will feature on Create and Craft on Friday 4th November 1pm,
SKY 674 • FREEVIEW 23 • VIRGIN 748 • FREESAT 813.
All these products will feature on Create and Craft on Friday 4th November 1pm,
SKY 674 • FREEVIEW 23 • VIRGIN 748 • FREESAT 813.
Wednesday, 26 October 2016
Inspirational Autumn Colours
Just love this time of year. I was lucky enough to be out walking the
dog in the beautiful Yorkshire Dales on Monday morning and noticing how
the trees are starting to change colour. Great inspiration for another
colour palette.
Thursday, 20 October 2016
Beautiful Papers
Here are a few of the designs from our NEW Papermaker pads Flourish and Botanical. We hope you love them as much as we do.
Papermaker Pads
We've just taken delivery of our two BRAND NEW Papermaker Pads now available at our trade only Warehouse in Heckmondwike or online from our trade website www.craftstyleproducts.co.uk
Subscribe to:
Comments (Atom)


